What is ConvertKit and how to use it? Read this guide to learn how you can use ConvertKit to grow your business.
Email is a powerful marketing tool and is considered the best way to reach customers and promote your business.
In fact, a study by McKinsey & Co found that email marketing is still 40 times more effective than Twitter or Facebook if you want to reach your target consumer.
An obvious reason why email is an effective marketing medium is its reach: the number of email users across the world stands at 3.9 billion and is projected to cross 4 billion by the end of 2021.
Besides, the fact that email is customizable, personal, permission-based and measurable also makes it such an attractive option for marketers.
So, if you haven’t included email in your marketing strategy before, it’s high time you did it without further delay.
If you are new to email marketing or decide to switch from the platform that you are currently using, you’ll see many options out there that’ll definitely make your head spin.
In this guide, we will introduce you to ConvertKit, one of the most popular and fastest-growing platforms in the market. Founded in 2003, it is a fully fledged and powerful email service provider.
We will also walk you through every step that you need to learn to get started with this amazing email marketing tool.
ConvertKit offers some great features like customizable and easy-to-embed signup forms, well-designed landing page templates, a visual automation builder so that you can send targeted and timely emails to your contacts, mobile-responsive designs, numerous integrations, etc.
Related: What is MailChimp And How to Use it?
Moreover, ConvertKit offers an excellent and easy-to-understand pricing structure. It has recently launched its free plan, which includes all the premium landing page templates, unlimited forms, an option to unlock subscribers and email sending by inviting your friends, and much more.
ConvertKit is basically a platform focused on content creators like YouTubers, bloggers, podcasters and other businesses who are building audiences.
Hopefully, you have got the picture of ConvertKit. Let’s see how it works.
How to use ConvertKit?
We are going to discuss the following sections in detail throughout this article:
- Create a ConvertKit account
- Set up your account info
- Import your contacts lists
- Set up a form
- Embed forms on your site
- Build and send email sequences
Create a ConvertKit Account
Creating an account in ConvertKit is a piece of cake. To get started with ConvertKit for free, just follow the below steps:
- Go to ConvertKit’s website and click the TRY IT FOR FREE button at the top-right corner.
- ConvertKit will ask you whether you’re moving from another email marketing software or a newcomer to the field and gives you two options: ‘Yes! I’m moving from another tool’ or ‘No. I’m just starting with email.’ Click the button accordingly.
If you click on ‘Yes! I’m moving from another tool’ button, you need to follow these steps:
- Select the previous email service provider with whom you were working with.
- Select the lists of subscribers you want to move to ConvertKit.
- Add the login details, which include email address and password.
- Click Get Started.
However, if you click on “No. I’m just starting with email’ button, you’ll need to do this:
- ConvertKit will ask whether you have a website or not.
- Click Yes if you have one and select the CRM (WordPress, Wix, Shopify, etc.) you’re using.
- If don’t have any site, click No.
- Finally, fill up the form and click Get Started.
That’s it! You’re ready to experience the amazing features of ConvertKit.
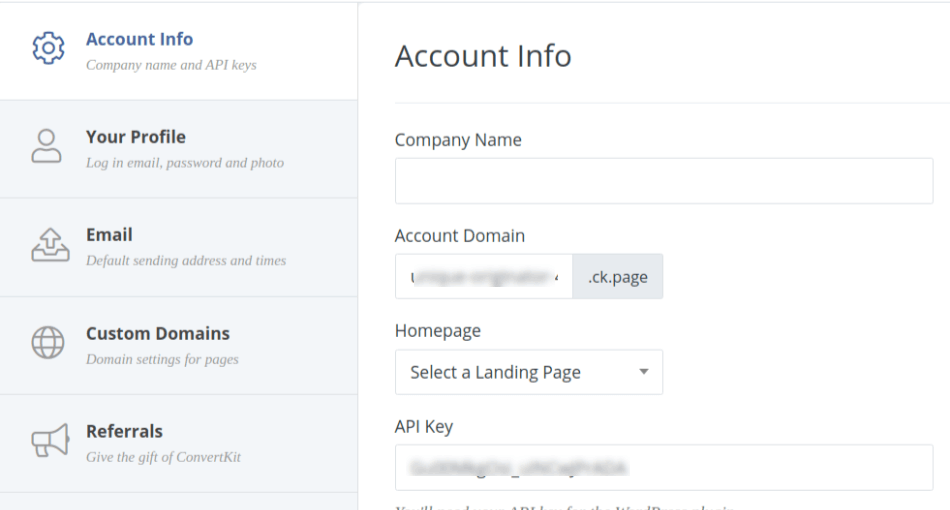
Set Up Your Account Info
Once you are done with creating your account, you need to confirm your subscription before building and sending emails.
Next, before going to create signups and sequences, make sure to configure your account settings by adding company name, company email address, new password, from name, reply-to email, send time, physical address, card information, and more.
Note: If you’re managing more than one site, you have to add and confirm all of your email addresses here.
Import Your Contact Lists
Note: You can jump to the next step if you don’t have any subscriber list at the moment.
ConvertKit lets you import contacts into any Form, Tag, and/or Sequence. It’ll be great if you import subscribers into a tag. Let’s see what it takes to do this:
- Identify the subscriber lists that you want to export from your previous email service provider to ConvertKit.
- Export the lists one by one. Just click on Export button and save it as a CSV file.
- Now, access the Subscribers tab in your ConvertKit’s account and click + Create a tag appearing on the sidebar.

- Give your tag a name (for example, imported subscribers) and click Save.
- In the Subscribers tab, click on the Import Subscribers button.
- Make sure to import the CSV file into the tag you have just created.
- Map the columns in your CSV file to the correct fields (any columns that are not mapped to a field will not be imported).
- Repeat the process for each list you want to import to your ConvertKit account.
Set Up a Form
Signup forms play a pivotal role in growing your subscriber list. To set up one in ConvertKit, you need to follow the steps below:
- Click on Create Form.
- Choose Form to go ahead.
- Select the display format of your Form from the available options, i.e. Inline, Modal, Slide in and Sticky bar.
- Now, choose a form template from Minimal, Clean and Full. Once you’ve selected your form template, you can customize anything you want such as add name of the form, headings, edit the button text, change colors, and more.
- Go to the Style tab given on the right-hand side of the editor to find out how your form looks like to your subscribers and make changes if needed.
- Use the form editor to add, re-label and rearrange form custom fields.
- Once you’ve done with the styling of your form, go to Settings and add the name of your form and success message that subscribers will get after signing up to your site.
- Click the prominent Save button on the top right corner to make changes.
Got the form you want? That’s great! Now, it’s time to set up your confirmation email, also known as incentive email.
In ConvertKit, double opt-in on all of your forms is the default setting. Subscribers who make a confirmation and receive an incentive email are expected to stay with you for a longer period.
If you want to offer a freebie (an e-book, for example) as an incentive to your new subscribers, you need to upload a PDF file in ConvertKit.
When subscribers click the file to get the incentive, it will automatically confirm the email address and allow you to communicate with them in the future.
In case you don’t have any incentive, you can add a URL that you want your new subscribers to go to when they click on the confirmation link. The URL can be a confirmation page on your website or a homepage.
Embed Form on Your Website
Now, it’s time to add form to your website or a blog post to get more and more subscribers.
To embed your form on your site, follow the steps below:
- Go to Settings and click on the Embed tab.
- ConvertKit gives you five options to add the form on your site, including one line from JavaScript, raw HTML, a direct link, a WordPress short code, and Unbounce URL.
- Copy and paste any one of them on your website where you want the form to appear.
If you are using WordPress, always switch to the Text view before pasting the JavaScript or HTML code. Otherwise, you will see the coding instead of your form.
Build and Send Email Sequences
An email sequence, also known as automated workflow, is a series of emails sent automatically to your lists or segments based on triggers (subscribers’ actions such clicking a link, making a purchase, etc.). You can also schedule your sequences.
In ConvertKit, building sequences is one of the easiest tasks. To create one or more, follow the steps below:
- Go to Sequences page and click ‘New Sequence’ button appearing near the top right corner of the screen.
- Give your sequence a name (You can change it anytime, as it is only for your reference).
- Once you’ve created the sequence, you’ll be taken to the Sequence Editor. Select the newly created sequence in the sidebar and make changes in the editor to the right.
- To add new emails, click the + Add Email button in the sidebar, located below the sequence you’ve just created.
- Your sequences are by default set to the Draft mode. In order to publish them, select Published from the drop-down under the STATUS menu on the editor.
- To adjust sending delay, click WHEN TO SEND and scheduled your sequences.
- You also have the option to preview your email. You’ll see two options under the Preview tab: Browse and Email, which means you can either view your email within the browser or send yourself a test email.
- To add a filter or delete the email, click on their respective symbols shown alongside each other at the top middle of the editor.
- Finally, make sure to click the red-colored Save All button when you are ready to save any of your changes.
That’s all you need to learn to get started with ConvertKit, which is undoubtedly super-easy and doesn’t take much of your time. You can do all things from setting up an account to creating signup forms, sequence, incentive emails and much more without expert help. You will find quick videos in each and every section to make sure you never feel lost.
ConvertKit is an excellent email marketing tool, which is evident from its user rating. On Capterra, a reputable software application review company, ConvertKit enjoys an exceptional rating of 4.8 out of 5 stars based on 88 customer reviews. Customers generally love ConvertKit’s ease of use, visual automations and clean interface.
ConverKit Pricing
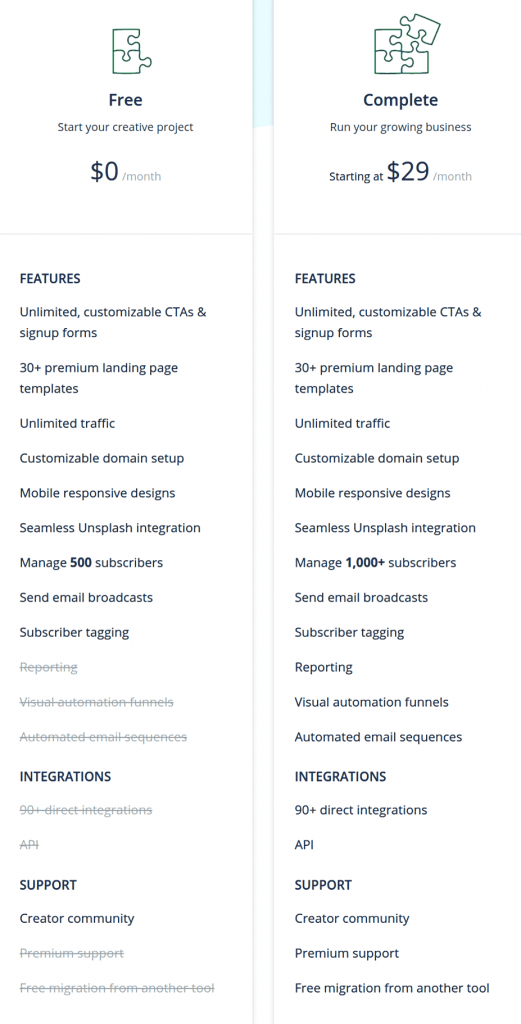
The platform also comes with an easy-to-understand pricing structure, which includes only two plans: Free and Complete.
The Free package offers:
- Unlimited, customizable CTA (call-to-action) and signup forms
- More than 30 premium landing page templates
- Unlimited traffic
- Customizable domain setup
- Mobile responsive designs
- Seamless Unsplash integration
- Manage up to 1,000 subscribers
- Send email broadcasts
- Subscriber tagging
The premium Complete package, starting at $29 a month for up to 1,000 subscribers, is packed with all the features that come with the free plan, plus:
- Reporting
- Visual automation funnels
- Automated email sequences
- 90+ direct integrations
- Premium support
- Free migration from another tool